Printfriendly

Showing posts with label appetizers. Show all posts

French Onion Soup Dip!


If you have been looking for something a little different for game day, movie night or to serve at your annual Halloween gathering, this French Onion Soup Dip might be your answer.  It's always one of the first things to go at any party!   I love a good French Onion soup myself so I knew this dip would be a keeper for me.   It's also fairly easy!   Here is what you will need:
 
1 (10.5 oz.) can of condensed French Onion soup
2  (8 oz.) pkgs. cream cheese, softened
1/3 cup  mayonnaise
2  1/2 cups shredded Swiss Cheese, divided
1/2 cup shredded Parmesan cheese
1 tsp. Worcestershire sauce
1/2 tsp. garlic powder
 
Blend the cream cheese, mayonnaise and French onion soup together until smooth.  Add 2 cups Swiss cheese, 1/2 cup Parmesan cheese, 1 tsp. Worcestershire sauce and garlic powder. 
Pour into a 1 1/2 quart casserole dish you have sprayed with nonstick spray.  Sprinkle the top with the other 1/2 cup of Swiss cheese. 
 
Place in a 375 degree oven for 35-40 minutes.  It will be hot and bubbly and just starting to brown.

Serve with crackers, tortilla chips, slices of French bread, or I like it with bagel chips!  If you have any leftover, it's even better the next day! 


Bacon Ranch Pull Apart Bread!


If you love bread and cheese like I do, this is going to be right up your alley.  This takes a simple loaf of French bread and some cheese and a few other things and makes a loaf of yummilicious goodness! This is so good with pasta dishes...spaghetti, lasagna or with soups.  It also makes a great casual party appetizer.  Here is all you need for this:

1 loaf French bread (can use sourdough or Italian)
1/ 2 cup butter, melted
1/2 packet of dry Ranch dressing mix
8 oz. cheddar cheese, shredded
8 oz. mozzarella cheese, shredded
1/2 cup of real bacon bits or you can use bacon cooked crisp and crumbled


Place the bread on a sheet of foil and cut it in about 1 inch squares, but not all the way through.  Just cut down about 3/4 of an inch.   I just cut on the diagonal, because my bread already had the baker's cuts going one way like that.   If your bread is smooth, you can just cut straight across horizontally and vertically.


Mix the dry ranch dressing mix with the melted butter.  Pull the bread slightly apart and pour the butter mixture over and down into the cuts.


 Sprinkle with the cheddar cheese and the mozzarella cheese and push some of it down into the cuts of the bread.   Finish by sprinkling bacon evenly over the top.   Cover loosely with foil and place in a 350 degree oven for 15 minutes.  Uncover and increase the oven temperature to 425 and allow to bake for another 10 minutes or until the cheese just starts to brown. 
 
 
You can garnish with some sliced green onions or chives or serve just as it is, piping hot from the oven.  Just pull this off in big chunks.  I will warn that it is addictive!


Buffalo Chicken Biscuit Bombs!


If you love anything that is called 'buffalo chicken", these yummy "Buffalo Chicken Biscuit Bombs" are a must try!!!   This is perfect game day food and you won't believe how easy they are to make!  

You can use rotisserie chicken, leftover chicken or just cook a couple of chicken breasts to use.  This recipe uses ingredients you probably have on hand most of the time! 

Here is what you will need:

1 1/2 cups shredded chicken
1/4 cup buffalo wing sauce  (I used Franks wing sauce)
4 oz. cream cheese, softened
1/4 tsp. celery salt
1 Tbs. prepared ranch dressing
1  (16.3 oz) can Pillsbury Grands biscuits
2 Tbs. crumbled blue cheese, optional
1 cup Monterrey Jack Cheddar blend cheese, shredded
1/4 cup butter, melted
1 Tbs. dry ranch dressing mix
1/4 cup grated Parmesan cheese

Preheat oven to 375 degrees.

In a bowl mix the shredded chicken, wing sauce, cream cheese, celery salt and ranch dressing until combined.

Place each biscuit on a piece of wax paper or a pastry sheet and roll it out until flat. 


Place a heaping tablespoon of the chicken mixture in the center of each biscuit.  Sprinkle with the blue cheese crumbles.  The blue cheese is optional and can be left out if you don't care for it.  Sprinkle with the shredded Monterrey Jack Cheddar cheese. 


Gather each biscuit up and pinch it together like a dumpling.  Turn the seam side under and place in a baking dish sprayed with nonstick spray.  

Mix the melted butter with the dry ranch dressing mix and Parmesan Cheese and brush over each biscuit.  

Place in a 375 degree preheated oven and bake for 15 to 17 minutes or until golden brown.
Serve just like this or drizzle with a little more ranch dressing or if you like extra spicy, more wing sauce!  They are so yummy!  


Spinach Dip in a Bread Bowl!


This is a cold spinach dip that is served in a bread bowl with chunks of the bread for dipping.   The King's Hawaiian Bread is the best for this.  While I love a good hot spinach and artichoke dip also, I really think I like this cold spinach dip the best.  It can even be made up a day or even two ahead and then you just have to assemble your bread bowl the day of your party.  

  Here is what you will need:

1  10 oz. package of frozen chopped spinach, cooked, cooled and squeezed until all liquid is removed
1  16 oz container sour cream
1 cup mayonnaise
1 pkg. vegetable soup mix (Knorr brand is best)
1  8 oz. can water chestnuts, chopped
3-4 chopped green onions, including some of the green blades
1 round top loaf of King's Hawaiian Bread  ( I usually use two to have more bread for dipping)


Combine all of the ingredients in a mixing bowl until well blended.   TIP:  Use paper towels to press all of the liquid out of the spinach.  If you leave water in it, your dip will be too watery and will not hold up well.


Chill for at least 2 hours.  It's best if it chills overnight to blend flavors.


When you are ready to serve, place the bread on a platter big enough to also place the cubed bread around the edges.  With a serrated knife carve out a bowl in the center leaving a good shell to hold the dip.  Cube the bread in big chunks that you remove. I usually use two loaves and use one just for the bread cubes, because what you remove from the center is never enough.


Fried Cucumbers!


I have had so many cucumbers this year, so I am using them in every way possible.  I mean there are only so many salads you can eat!    It has been said we will bread and fry anything in the south and it will be good!!!  That's almost the truth!!!   Why not fried cucumbers then?   We fry squash, okra, green tomatoes, pickles, mushrooms...so why not cucumbers?    They are delicious!!!   If you have never tried them, they are less tart than fried green tomatoes and lighter in flavor than squash, but they are yummy!! ! 

4-5 medium size cucumbers
2 cups buttermilk
1 cup cornmeal
1 cup flour (self rising or plain, doesn't matter)
1 tsp. salt
1/2 tsp. black pepper
Cajun seasoning (I use Tony Chachere's) optional
oil for frying


Slice the cucumbers, unpeeled, in about 1/4 inch slices.  Pour buttermilk over them and let them stand a few minutes.   Mix the cornmeal, flour, salt and pepper.   Dredge the slices of cucumber in the mixture until well coated.  


Heat the deep fryer or about 2-3 inches of oil in a deep pan to 350 degrees.  Carefully drop the cucumber slices into the fryer in batches.  You will probably have 2 to 3 batches depending on the size of the fryer.  Let them cook for about 5 minutes or until golden brown.  Flip them over once to be sure they brown on both sides. 


 Remove to a paper towel lined plate.  I like to sprinkle lightly with Cajun seasoning at this point, but that is optional. Serve these immediately.  They are best when right out of the fryer!


These are so good dipped in Mississippi Comeback Sauce!!!


Cheesy Taco Ring!


This is a fun and interesting way to serve tacos.  It's great for parties...kids and teens love it or just for offering your family something a little different.  It's really easy to put together and serves a lot of people also.
 Here is what you will need for this:

1  1/2 lbs. ground beef or chuck, browned and drained
1 envelope taco seasoning mix
1/4 cup water
2 cups shredded cheddar cheese
2 cans crescent rolls (I used Pillsbury)
1 egg white, beaten
salsa, lettuce, diced onion...whatever you want for garnish

Preheat oven to 350 degrees.

After you have browned your beef and drained any excess grease, add the taco seasoning and water. Bring up to a bubble and simmer just until most of the liquid has absorbed.  Turn the heat off and stir in 1 cup of the cheese.


On a large pizza pan or oven proof platter arrange the crescent rolls overlapping the widest ends with the small pointed ends pointing outward.  Seal the edges by pressing the seams together.   Spray it lightly with nonstick spray. 

 Leave your crescent rolls in the refrigerator until you are ready to unroll them and they will be much easier to work with.  

With a scoop place a large scoop of the taco filling at base of each crescent roll.


Sprinkle the other cup of cheese over the taco filling.  Pull each crescent roll up and over the filling and press it down to seal the dough together.  

Brush the top dough with the beaten egg white! 

 Place in oven that has been preheated to 375 degrees for 25 to 30 minutes.  Remove from the oven and place whatever condiments you want to serve in the center.  I placed a bowl of salsa in the center.   Use whatever your family likes...sour cream, salsa, olives....the possibilities are endless.  


Slice in sections between rolls!


This is always a huge hit with everyone!  Enjoy! 


Fried Dill Pickles!


I have to admit that I really love "Fried Dill Pickles" and I am not even a big dill pickle eater, but there is something about dredging them in cornmeal and frying them that makes them delicious.  There are several restaurants in our area that serve fried dill pickles as an appetizer and most are really good, but my favorite fried pickles are at a little place called "Toots".  It's a sports bar and  burger sort of place and they do this type of food really well.  It's a small chain restaurant mostly located in Kentucky and Tennessee.  When I started frying my own pickles at home, my goal was to fry them as good as Toot's.  Not 'tooting' my own horn or anything (that was just bad), I think I accomplished what I set out to do!   I prefer the fried pickle slices, but you can do the spears if you like more pickle and less crust. I am all about crust, myself!

 Here is what you need:

1 (16 oz.) jar of dill pickle slices (  I like to use Vlasic ovals)
1 cup buttermilk
6-7 drops of hot sauce
1 cup self rising flour
1 cup cornmeal
1 tsp. Cajun seasoning (can substitute seasoned salt if you don't like the spiciness)
1/2 tsp. black pepper
1/2 tsp. garlic powder
oil for frying

Drain the jar of pickles in a colander.


Spread the pickle slices out on a double thickness of paper towels to get the liquid off of them as much as possible. 

When they are fairly dry, mix the buttermilk and hot sauce in a bowl and place the pickle slices in it.  If you don't drain them first, the buttermilk won't adhere to the slices.

Combine the flour, cornmeal and seasonings in a shallow dish, like a pie plate.  Remove the pickles and dredge them in the mixture, making sure to cover each slice.   Drop a each slice in a deep fryer with oil heated to around 375 degrees.   Make sure your oil is hot enough, but not smoking.   You can use vegetable oil, canola oil, or peanut oil.   If you don't have a deep fryer, you can use a heavy pan with high sides on the stove.
 

 The pickles will float to the top if your oil is good and hot.  Turn each one over to brown both sides.  Use a slotted spoon to remove them when they are brown to a paper towel lined plate.  If you like them really salty, sprinkle immediately with a little more salt.  For me, the seasoning added to the flour is enough, because the pickles are already salty. 


Serve immediately with ranch dressing!

Mississippi Sin Dip!!!


If you need something wonderful for game day, card night, movie night or whatever the occasion, this "Mississippi Sin Dip" is a must try!!!   This stuff is delicious!!!  

I am not sure where the name came from, but I am pretty sure it's because it's sinfully yummy!!! 

This is great for parties, because you can prep it beforehand and then bake it right before your guests arrive!!!  

Here is what you will need:

1 (8oz.) pkg. cream cheese, softened to room temperature
1  1/2 cups sour cream
1/2 cup mayonnaise
1 tsp. garlic powder
2 tsp. Worcestershire sauce
1 Tbs. Frank's or Texas Pete wing sauce
2 cups sharp Cheddar cheese, shredded
1 cup diced deli ham
1 round bread loaf
3-4 green onions, sliced, including the green tops
assorted crackers, tortilla chips, or Frito scoops for dipping

Preheat oven to 350 degrees.

In a mixing bowl beat the cream cheese with an electric mixer until it's smooth and fluffy.  Add the sour cream, mayonnaise, garlic powder, Worcestershire sauce, hot sauce and mix well.  Stir in the cheddar cheese and ham.


With a serrated knife hollow out the bread, creating a bowl to hold the dip.  Don't make the shell too thin so it's substantial enough.   I like to use King's Hawaiin Bread, but you could use any thick, round or oval shaped bread you like.  French bread works well also.  Save the chunks of bread you cut out to use dipping!  


Place the bread bowl on a baking sheet.  Fill the bread bowl with the dip mixture!  Wrap it in aluminum foil and place in the oven for 40 minutes.  Remove the foil and place back in the oven for about 5 - 10 minutes!!  Be careful to not let the bread get too dark. 


Remove from the oven and sprinkle the top with the green onions!!! Place the bread chunks around the dip bowl to use for dipping along with crackers and chips!!!  This always disappears fast!  Enjoy! 


Bacon Ranch Deviled Eggs!


As we have discussed before, "Deviled Eggs" are a southern staple for holidays, parties, potlucks, cookouts....anytime people gather to eat!!!  Some people get hung up on the name with the 'devil' being in it.

The term ''Deviled' is just a food term for anything cooked with hot spices or spiced up some way.  We actually also called them 'dressed eggs' in our part of the country.

Whatever you call them, they are dang good and always a crowd pleaser and with all ages!

You know I like to change things up a bit sometimes and since I love anything with 'ranch seasoning' and 'bacon', why not put them in the deviled eggs!!!

 I played around with it and I must say it's delicious.   I actually liked these better than the original eggs and they are so easy!!!  

Here is what you will need:


10 slices bacon, cooked crisp and crumbled
12 eggs, hard boiled
1/4 cup mayonnaise
2 Tbs. sour cream
1 Tbs. dry ranch dressing mix
1 tsp. mustard, yellow or Dijon
1 Tbs. grated Parmesan cheese
dash of salt and black pepper
dash of Tabasco sauce (optional)
paprika or Cajun seasoning for garnish

Place eggs in enough water to cover them.  Add a tsp. of vinegar and a dash of salt and they will peel much easier.  Also, if you can, don't use really fresh eggs that you just bought.  They are much harder to peel than eggs you have had in the fridge for a few days.  

Bring to a boil and boil for just a minute with cover on pan.  Turn heat off and let sit for about 12 to 15 minutes in the hot water.  Run under a couple changes of cold water and peel.  They will peel much easier.

With a sharp knife cut down the center lengthwise.  Remove the yolks and place in a bowl.  Mash with a fork.  Add half of the bacon  crumbles and all of the other ingredients and stir together until smooth.  

You can fill them with a spoon or put the filling in a piping bag and pipe it in for a very pretty presentation.  Sprinkle with just a little paprika or I like to sprinkle with just a bit of Cajun seasoning which gives them a little more spiciness. 

Finally top them off with the other half of the bacon crumbles!!!  

These are so yummy and they will disappear fast!!!  Enjoy!!!


Hissy Fit Dip!!!


You might be thinking how in the world did this dip get this name?  Well, the story goes, that someone made this dip and served it at an SEC football tailgating party and it was a huge hit!!!  It was such a hit that a certain southern belle, didn't get any and she threw one heck of a 'hissy fit' about it!!!   So from then on, this yummy dip has been called "Hissy Fit Dip"!!!   This really is a good dip for game day, tailgating or holiday parties!!! 

 Here is what you need:

1 lb. breakfast sausage
1/4 cup sweet onion, diced fine
8 oz. cream cheese, cubed
8 oz. Velveeta cheese, cubed
1 cup shredded Monterrey Jack or Muenster cheese
16 oz. sour cream (do not use light)
1 tsp. Worcestershire sauce
1 tsp. soy sauce
1/4 tsp. garlic powder
1/4 tsp. Cajun seasoning (I used Tony Cachere)
1/4 tsp. Curry powder (optional)
dash of hot sauce to taste 

Preheat oven to 350 degrees.

In a large skillet brown the sausage and add the onion while browning and cook until translucent.  Turn heat to low once browned and add all of the other ingredients and stir until it is all well incorporated.

Spray a 2 quart casserole dish with nonstick spray and pour the mixture in.  Place in the oven and bake for 45 minutes.   If this starts to brown too much on top, cover the top loosely with a sheet of foil.   When it's hot and bubbly remove from over and serve!!! 


I like this served with Frito scoops or tortilla chips, but you can also serve with crackers or veggies!!!   This disappears fast!!! 


Bacon Wrapped Jalapeno Poppers!


I planted four jalapeno pepper plants this year and you wouldn't believe how many peppers I had and I am still getting off of them.  It was crazy!!!   Evidently the horribly hot weather is just what these plants crave!!!  I always plant a few each Spring, but I have never had so many peppers!   I have been trying to use them in as many ways as possible.   These "Jalapeno Poppers" turned out to be one of my favorites.   I have always loved any type of 'popper' when ordering appetizers at a restaurant so I figured this would be right up my alley!!!   These are great for serving at parties or for game day food!   Here is what you will need:

18 large fresh jalapeno peppers
1  (8 oz.) pkg. cream cheese, softened to room temperature
1/4 tsp. garlic powder
pinch of Cajun seasoning (I use Tony Cachere)
1 cup shredded cheddar cheese
18 slices of bacon cut in half

Preheat oven to 375 degrees.

Cut the peppers in half lengthwise and remove the seeds and any membrane inside.  It's best to wear gloves for all of this and do not rub your eyes until you remove them.


In a bowl, mix the cream cheese, seasonings, and shredded cheddar cheese.   With a spoon, stuff each pepper half and then wrap with a half slice of bacon.   You can secure with a toothpick which is nice for serving, but the bacon will usually stay wrapped without one also.    Place on a baking sheet covered with nonstick foil or sprayed lightly with nonstick cooking spray.  

Place in the oven and bake for about 30 minutes or until the bacon is done.   Serve immediately.  These are good served with ranch dressing for dipping or really they are great just alone.  They disappear fast!!!  

Mini Party Quiches!


These "Mini Party Quiches" are yummy little bites of sausage and cheese quiche baked in a cream cheese crust!  They are so good and really very easy!  They are perfect for parties, wedding or baby showers, graduation parties, teas, or wedding receptions!

They are also good to make up and freeze part of them to keep on hand for a quick breakfast on the go!  Just pop them in the microwave or oven and warm them up.  They heat back up real well.  

Here is what you will need for these:

Crust
1 cup butter softened
6 ounces cream cheese, softened
2 cups all purpose flour
1/4 tsp. salt

Filling
8 oz breakfast sausage
3/4 cup shredded Swiss cheese
1/2 cup shredded Parmesan cheese
3 green onions, sliced thin including some of the green blades
3 eggs
1 cup half and half cream
1/4 tsp. black pepper
1/4 tsp. salt
dash of hot sauce (I used Tabasco, but if you used hot sausage you can omit this)

In a mixing bowl beat the cream cheese and butter together, gradually beat in the flour and salt.  If the dough seems too stick add just a little more flour.  Shape into a large ball in the bowl.  Cover the bowl and refrigerate while you make the filling.  This is a sticky dough and works better if it's really cold.

Brown the sausage over medium high heat.  Drain any excess grease.  

When the dough is cold, after about 30 minutes to an hour, remove to make the crusts.  Spray 36 mini muffin tins with nonstick baking spray.  Take out about a tablespoon of dough for each crust and roll it into a ball.  Press the ball into the mini muffin tin working it up the sides of the tin.  Make it thin enough to leave room for the filling.  

When you have made the crusts, fill each one with sausage, Swiss cheese, and Parmesan cheese dividing it all evenly between the 36 muffin tins.   

In a bowl, whisk the eggs and cream together.  Add in the black pepper, salt and dash of hot sauce.  
Pour the egg filling evenly over the sausage and cheese in each tin.   

Place in a preheated 375 degree oven for 17 - 20 minutes or until the top is slightly browned.

Baked Goat Cheese in Marinara Dip!


This appetizer recipe came from the folks at the Red Gold Tomato company and it is so delicious.   This would be perfect for your Super Bowl Sunday lineup.  The Red Gold Tomato company has been so nice to provide me with a variety of their products to sample in the last few years and now I have been asked to be an ambassador for their company and products.  I have always loved their tomatoes and such, even before I started writing this blog.  Now, I will have several challenges from them to share with you all.  

My first challenge was to compare a can of whole. peeled Red Gold tomatoes to a can of whole peeled Hunts tomatoes.  Here is what I found:

I poured the tomatoes from each can into a cutting tray they provided.  
This is my scorecard.  I was to rate each one from 1 being poor to 5 being extraordinary. The categories were Appearance - color and uniformity of size and integrity, amount of peel and seeds in sample, the media or juice, flavor intensity, and flavor attributes.  

I was to cut each tomato in half. This is the Red Gold one which was much firmer and intact.  They were also much more uniform in size.  On flavor, both tasted good, with nothing off about either of them, but the Red Gold tomatoes tasted a bit fresher.   As you can see, from the final score, while both cans of tomatoes were good,  the Red Gold tomatoes were just better.  

After my test was over I used the Red Gold tomatoes to make the tasty recipe.  Here is what you will need:

8 oz. goat cheese
5 Tbs. extra virgin olive oil
1 medium sweet onion, diced
3 cloves of garlic, minced
1 (28 oz.) can whole, peeled Red Gold tomatoes
1 tsp. basil
1 tsp. oregano
1/2 tsp. salt
1/4 tsp. pepper
2 tsp. sugar
3-4 sliced green onions, including the green blades

Preheat oven to 350 degrees.

In a skillet saute the onions and garlic in the olive oil until soft.  Add the tomatoes with their juice, basil, oregano, salt, and pepper.  Cover and cook for about 10 minutes.  Uncover and mash the tomatoes or what I do is use my kitchen shears to cut them up.   Cook uncovered for 20-30 minutes more.  

Place the goat cheese in the center of a rectangular baking dish you have sprayed with nonstick spray. You should have enough room for a one inch border around it.  Pour the marinara sauce around the goat cheese, but don't cover it, just around the edge.   Place in the oven and bake for 25 to 30 minutes. 

Remove from oven and allow to cool for a few minutes.  Sprinkle with green onions.  Serve with garlic bread or on crostini!  This is so good, I can eat it alone!  


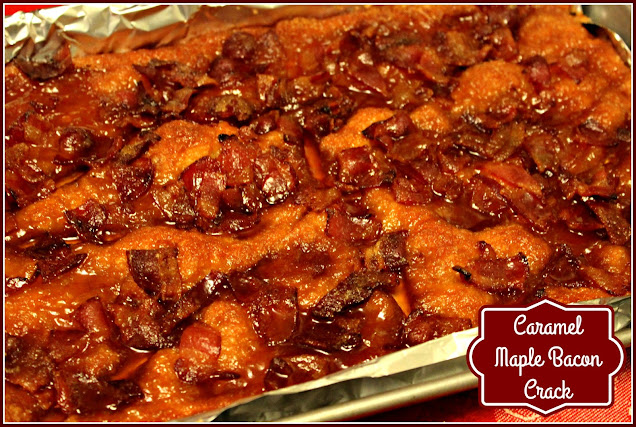
Caramel Maple Bacon Crack!


This "Caramel Maple Bacon Crack" or a.k.a. "Bacon Crack"  is called such a name, because it is very addicting!  This is the sort of sweet and salty combination I just love and it's so easy with 4 ingredients!   This is perfect game day food and with the Super Bowl coming up, it's a must try!  This would also be great for breakfast for brunch!  Everybody loves this stuff!  Here is what you will need:

1 lb. bacon
1 (8 oz.) can refrigerated crescent rolls ( you can use the non perforated sheet of crescent rolls dough also)
1/2 cup maple syrup
3/4 cup brown sugar
pinch of cayenne pepper (optional)

Cook the bacon to just until it is almost crispy.  This cooks more in the oven.   I microwave mine, but however you usually cook your bacon is fine.  Remove to a paper towel lined plate.  

Preheat the oven to 325 degrees. 

Line a rimmed cookie sheet with aluminum foil.  I prefer the nonstick Reynolds Wrap.  Spray the foil with nonstick spray.  Lay the crescent roll dough on the foil.  Do not separate the rolls.  If you are using the type with the holes in it, seal those together.  

 Prick the dough all over with a fork.   Drizzle half of the syrup over the dough.  Chop the bacon in pieces and sprinkle evenly over the syrup.  I keep the pieces bite sized.  

Sprinkle half of the brown sugar over the bacon and then drizzle with the rest of the maple syrup. If you like a little spicy with your sweet and salty, sprinkle the top with just a pinch of cayenne pepper to your taste!  This is totally option.  It's great either way.  

 Place in the 325 degree oven and bake for 25 minutes.  


All to cool for about 10 minutes and then cut in pieces.   I just cut along the lines of the individual rolls and the cut those pieces in about thirds.

FOLLOW ME HERE ON FACEBOOK FOR DAILY POSTS:

Follow Me on Pinterest