Printfriendly

Showing posts with label party foods. Show all posts

French Onion Soup Dip!


If you have been looking for something a little different for game day, movie night or to serve at your annual Halloween gathering, this French Onion Soup Dip might be your answer.  It's always one of the first things to go at any party!   I love a good French Onion soup myself so I knew this dip would be a keeper for me.   It's also fairly easy!   Here is what you will need:
 
1 (10.5 oz.) can of condensed French Onion soup
2  (8 oz.) pkgs. cream cheese, softened
1/3 cup  mayonnaise
2  1/2 cups shredded Swiss Cheese, divided
1/2 cup shredded Parmesan cheese
1 tsp. Worcestershire sauce
1/2 tsp. garlic powder
 
Blend the cream cheese, mayonnaise and French onion soup together until smooth.  Add 2 cups Swiss cheese, 1/2 cup Parmesan cheese, 1 tsp. Worcestershire sauce and garlic powder. 
Pour into a 1 1/2 quart casserole dish you have sprayed with nonstick spray.  Sprinkle the top with the other 1/2 cup of Swiss cheese. 
 
Place in a 375 degree oven for 35-40 minutes.  It will be hot and bubbly and just starting to brown.

Serve with crackers, tortilla chips, slices of French bread, or I like it with bagel chips!  If you have any leftover, it's even better the next day! 


Southern Fruit Tea!


Fruit Tea is a very southern beverage that has been around for years and years.  I am not completely sure where it got it's start, but I can almost guess the reason it was created came from the fact that we southerners do not waste anything.  We also know how to improvise when we don't have exactly what we need.

  
I can just picture some creative southern mama having juice leftover from breakfast and maybe also being a little short on sugar when making the tea for lunch and thinking, ..."hmmm, wonder if I dumped this orange juice I have leftover in the tea it would help sweeten it and still be really good?"   

So she did, and it was a hit and so next time she added a little pineapple juice also and then it just gained traction from there. 

Fruit Tea of this type is now served in the south as a beverage choice at various events....showers, receptions, and other sorts of special events and such.  However, some  southern restaurants and tea rooms serve their version of it also.  

There are many variations on this and it is not set in stone.  Different juices can be used.  This recipe is very summery and citrusy.  Some folks also like to use peaches or raspberry.   

This is great for a beverage choice for a wedding or baby shower and can be mixed and served like a punch in a punch bowl also.  

Here is what you will need for this:

2 family size tea bags or 8 individual tea bags
4 cups boiling water
1  1/2 - 2 cups sugar (according to your taste)
1 (6 oz.) can frozen orange juice concentrate
1 (6 oz.) can frozen lemonade
1 cup pineapple juice
10 cups water
1 lemon, sliced in thin slices
1 lime, sliced in thin slices
1 orange, sliced in thin slices
1 cup maraschino cherries, drained (optional)

Boil the tea bags in the 4 cups of boiling water just until it boils.  Turn off and cover to steep for at least 30 minutes.

In a gallon container (glass preferably) mix the warm tea with the sugar and stir to dissolve.  Once the sugar is completely dissolved add the orange juice, lemonade, and pineapple juice.  Stir to mix well.  Add the 10 cups of water and stir again.  

Make small cuts in the skin of the lemon, lime, and orange.  Just light cuts not through to the skin.  This releases the oils and flavor of the fruit. 

 Slice all three in thin slices and float in the fruit tea.  Add ice to completely fill the container and stir again.   To make it really pretty you can float the maraschino cherries in it! 


Old Fashioned Lemonade!


There is nothing on a hot summer day  in the South that tastes better to me than a glass of  'real' old fashioned lemonade!  Now, I love sweet tea and I drink it everyday, but that is just it, I drink it every day, so sometimes a change to lemonade is just very refreshing!   It seems that not a lot of people make real lemonade anymore.  There are so many of the mixes and lemonade products you can buy already prepared and some of them are pretty good.  I will admit that I am sort of addicted to the Crystal Light lemonade.  However, none of them are the same as real lemonade made with real lemons and sugar.  

The key to making good homemade lemonade begins with a simple syrup, which we will learn how to make here.  It's really quite...simple! 

This lemonade is  good to make for various parties and cookouts that so many are going to be having in the few weeks....graduation parties, baby and wedding showers, holiday cookouts.  It gives those who don't care as much for sweet tea and soda another choice.  My mother always makes this for such events and the lemonade is always gone pretty quickly.   Children, especially, really love it!

Here is what you will need:

6-8 lemons or enough to produce 1 cup lemon juice (depending on their size and juiciness)
1  1/2 cups water
1  1/2 cups sugar  (If you like your lemonade a little more tart reduce the sugar to 1 cup)
1 lemon, cut in thin slices

Place the water and sugar in a heavy saucepan and bring to a boil to make the simple syrup.  Boil for about 1 minute.

Juice the lemons, removing seeds and pulp.  Add lemon juice and simple syrup to a 2 quart pitcher and blend.  Add water and ice to fill. 

Lightly score one whole lemon you have reserved for garnish.  Don't cut deep, just light cuts in the skin.  Then slice in nice thin slices.    Add the slices to the pitcher of lemonade and stir.   Cutting the outer skin a little releases more of the oils and flavor of the lemon.   

Allow the lemonade to sit for about 30 minutes before serving for the best flavor. 

After about an hour, if there is any leftover and you want to save it for later, remove the lemon slices before refrigerating.  If the lemon slices are left in they will cause the lemonade to become bitter.


Cheesy Taco Ring!


This is a fun and interesting way to serve tacos.  It's great for parties...kids and teens love it or just for offering your family something a little different.  It's really easy to put together and serves a lot of people also.
 Here is what you will need for this:

1  1/2 lbs. ground beef or chuck, browned and drained
1 envelope taco seasoning mix
1/4 cup water
2 cups shredded cheddar cheese
2 cans crescent rolls (I used Pillsbury)
1 egg white, beaten
salsa, lettuce, diced onion...whatever you want for garnish

Preheat oven to 350 degrees.

After you have browned your beef and drained any excess grease, add the taco seasoning and water. Bring up to a bubble and simmer just until most of the liquid has absorbed.  Turn the heat off and stir in 1 cup of the cheese.


On a large pizza pan or oven proof platter arrange the crescent rolls overlapping the widest ends with the small pointed ends pointing outward.  Seal the edges by pressing the seams together.   Spray it lightly with nonstick spray. 

 Leave your crescent rolls in the refrigerator until you are ready to unroll them and they will be much easier to work with.  

With a scoop place a large scoop of the taco filling at base of each crescent roll.


Sprinkle the other cup of cheese over the taco filling.  Pull each crescent roll up and over the filling and press it down to seal the dough together.  

Brush the top dough with the beaten egg white! 

 Place in oven that has been preheated to 375 degrees for 25 to 30 minutes.  Remove from the oven and place whatever condiments you want to serve in the center.  I placed a bowl of salsa in the center.   Use whatever your family likes...sour cream, salsa, olives....the possibilities are endless.  


Slice in sections between rolls!


This is always a huge hit with everyone!  Enjoy! 


Fried Dill Pickles!


I have to admit that I really love "Fried Dill Pickles" and I am not even a big dill pickle eater, but there is something about dredging them in cornmeal and frying them that makes them delicious.  There are several restaurants in our area that serve fried dill pickles as an appetizer and most are really good, but my favorite fried pickles are at a little place called "Toots".  It's a sports bar and  burger sort of place and they do this type of food really well.  It's a small chain restaurant mostly located in Kentucky and Tennessee.  When I started frying my own pickles at home, my goal was to fry them as good as Toot's.  Not 'tooting' my own horn or anything (that was just bad), I think I accomplished what I set out to do!   I prefer the fried pickle slices, but you can do the spears if you like more pickle and less crust. I am all about crust, myself!

 Here is what you need:

1 (16 oz.) jar of dill pickle slices (  I like to use Vlasic ovals)
1 cup buttermilk
6-7 drops of hot sauce
1 cup self rising flour
1 cup cornmeal
1 tsp. Cajun seasoning (can substitute seasoned salt if you don't like the spiciness)
1/2 tsp. black pepper
1/2 tsp. garlic powder
oil for frying

Drain the jar of pickles in a colander.


Spread the pickle slices out on a double thickness of paper towels to get the liquid off of them as much as possible. 

When they are fairly dry, mix the buttermilk and hot sauce in a bowl and place the pickle slices in it.  If you don't drain them first, the buttermilk won't adhere to the slices.

Combine the flour, cornmeal and seasonings in a shallow dish, like a pie plate.  Remove the pickles and dredge them in the mixture, making sure to cover each slice.   Drop a each slice in a deep fryer with oil heated to around 375 degrees.   Make sure your oil is hot enough, but not smoking.   You can use vegetable oil, canola oil, or peanut oil.   If you don't have a deep fryer, you can use a heavy pan with high sides on the stove.
 

 The pickles will float to the top if your oil is good and hot.  Turn each one over to brown both sides.  Use a slotted spoon to remove them when they are brown to a paper towel lined plate.  If you like them really salty, sprinkle immediately with a little more salt.  For me, the seasoning added to the flour is enough, because the pickles are already salty. 


Serve immediately with ranch dressing!

Hissy Fit Dip!!!


You might be thinking how in the world did this dip get this name?  Well, the story goes, that someone made this dip and served it at an SEC football tailgating party and it was a huge hit!!!  It was such a hit that a certain southern belle, didn't get any and she threw one heck of a 'hissy fit' about it!!!   So from then on, this yummy dip has been called "Hissy Fit Dip"!!!   This really is a good dip for game day, tailgating or holiday parties!!! 

 Here is what you need:

1 lb. breakfast sausage
1/4 cup sweet onion, diced fine
8 oz. cream cheese, cubed
8 oz. Velveeta cheese, cubed
1 cup shredded Monterrey Jack or Muenster cheese
16 oz. sour cream (do not use light)
1 tsp. Worcestershire sauce
1 tsp. soy sauce
1/4 tsp. garlic powder
1/4 tsp. Cajun seasoning (I used Tony Cachere)
1/4 tsp. Curry powder (optional)
dash of hot sauce to taste 

Preheat oven to 350 degrees.

In a large skillet brown the sausage and add the onion while browning and cook until translucent.  Turn heat to low once browned and add all of the other ingredients and stir until it is all well incorporated.

Spray a 2 quart casserole dish with nonstick spray and pour the mixture in.  Place in the oven and bake for 45 minutes.   If this starts to brown too much on top, cover the top loosely with a sheet of foil.   When it's hot and bubbly remove from over and serve!!! 


I like this served with Frito scoops or tortilla chips, but you can also serve with crackers or veggies!!!   This disappears fast!!! 


Bacon Wrapped Jalapeno Poppers!


I planted four jalapeno pepper plants this year and you wouldn't believe how many peppers I had and I am still getting off of them.  It was crazy!!!   Evidently the horribly hot weather is just what these plants crave!!!  I always plant a few each Spring, but I have never had so many peppers!   I have been trying to use them in as many ways as possible.   These "Jalapeno Poppers" turned out to be one of my favorites.   I have always loved any type of 'popper' when ordering appetizers at a restaurant so I figured this would be right up my alley!!!   These are great for serving at parties or for game day food!   Here is what you will need:

18 large fresh jalapeno peppers
1  (8 oz.) pkg. cream cheese, softened to room temperature
1/4 tsp. garlic powder
pinch of Cajun seasoning (I use Tony Cachere)
1 cup shredded cheddar cheese
18 slices of bacon cut in half

Preheat oven to 375 degrees.

Cut the peppers in half lengthwise and remove the seeds and any membrane inside.  It's best to wear gloves for all of this and do not rub your eyes until you remove them.


In a bowl, mix the cream cheese, seasonings, and shredded cheddar cheese.   With a spoon, stuff each pepper half and then wrap with a half slice of bacon.   You can secure with a toothpick which is nice for serving, but the bacon will usually stay wrapped without one also.    Place on a baking sheet covered with nonstick foil or sprayed lightly with nonstick cooking spray.  

Place in the oven and bake for about 30 minutes or until the bacon is done.   Serve immediately.  These are good served with ranch dressing for dipping or really they are great just alone.  They disappear fast!!!  

Homemade Banana Split Ice Cream!


There is nothing as good as homemade ice cream in the summer!  Actually, I love ice cream year round, but it's one of my biggest weaknesses so I don't indulge often.  When I do, I like to go all out.  This "Banana Split Ice Cream" is one we have been making since I was a child and it's still a crowd pleaser.

 Here is what you will need:

4 ripened bananas, mashed
2 cups sliced fresh strawberries, sweetened with 1/2 cup sugar
2 (8 oz.) cans of crushed pineapple
1 (10 oz.) jar of maraschino cherries, drained and quartered
1/2 cup chopped walnuts or pecans (optional)
1 (14 oz.) can sweetened condensed milk
1 (12 oz.) can of evaporated milk
1 tsp. vanilla
1/2 cup sugar


Mix all ingredients in a large mixing bowl until well blended.  Pour into the freezer canister of an ice maker and freeze according to the manufacturers directions!   It usually takes 30-40 minutes.  When it stops turning or gets very slow you know it's ready.  Cover the canister with a thick towel or blanket and let it sit to ripen for 30 minutes to an hour!   Serve and enjoy!  


Celebration Punch!


If you are hosting a graduation party, a baby or bridal shower, or a reception of some sort, you need a good punch recipe that makes plenty for a crowd.  This is a really good one, because it's fairly easy, serves a crowd and it is loved by all ages!  You can also vary it up some, depending on who you are serving.   You can serve it like this with an ice ring or mold in the center or you can leave the ice ring out and add your favorite ice cream sherbet to it.  This makes it frothy on top and if you are serving children or teens, they love it!   Here is what you will need:

2 (2 liter) 7 Ups or Sprites
2 (2 liter) Ginger Ales
3 (64 oz.) tropical punch ( We used Fruit Juicy Red Hawaiian Punch)
3 Oranges (sliced in thin slices with the peel left on)
3 lemons (sliced in thin slices with peel left on)
3 limes (sliced thin slices with the peel left on)
1 pint fresh strawberries, capped and sliced
ice ring or mold

Variation:  Substitute 1/2 gallon of your favorite sherbet for the ice ring! You can use pineapple, lime, orange, raspberry sherbet, whatever you like or which goes well with your theme or event!  


Place your ice ring or mold in the center of the punch bowl.  Pour the 7-Up, Ginger Ale, and tropical punch over the ice, which will float to the top.   If your punch bowl won't hold all of this, use about half of all of the liquid and then just add to the bowl as the guests are served. Right before serving add the fruit all around the outside of the ice ring!   Don't add the fruit too early, because as if it sits for too long it can make it bitter.  If you are using the sherbet, scoop it in
 at the last!  

This makes a really pretty punch for special occasions and it's delicious!  


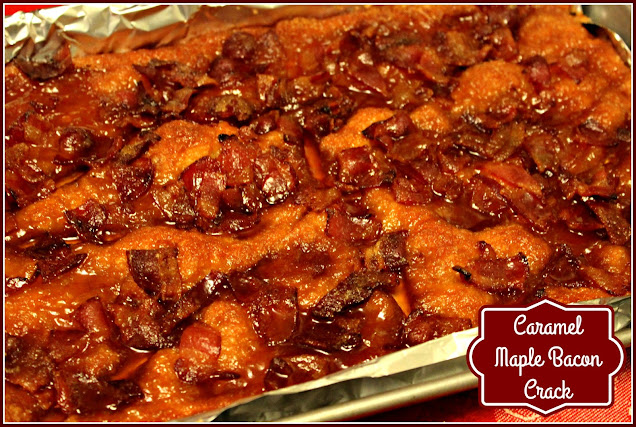
Caramel Maple Bacon Crack!


This "Caramel Maple Bacon Crack" or a.k.a. "Bacon Crack"  is called such a name, because it is very addicting!  This is the sort of sweet and salty combination I just love and it's so easy with 4 ingredients!   This is perfect game day food and with the Super Bowl coming up, it's a must try!  This would also be great for breakfast for brunch!  Everybody loves this stuff!  Here is what you will need:

1 lb. bacon
1 (8 oz.) can refrigerated crescent rolls ( you can use the non perforated sheet of crescent rolls dough also)
1/2 cup maple syrup
3/4 cup brown sugar
pinch of cayenne pepper (optional)

Cook the bacon to just until it is almost crispy.  This cooks more in the oven.   I microwave mine, but however you usually cook your bacon is fine.  Remove to a paper towel lined plate.  

Preheat the oven to 325 degrees. 

Line a rimmed cookie sheet with aluminum foil.  I prefer the nonstick Reynolds Wrap.  Spray the foil with nonstick spray.  Lay the crescent roll dough on the foil.  Do not separate the rolls.  If you are using the type with the holes in it, seal those together.  

 Prick the dough all over with a fork.   Drizzle half of the syrup over the dough.  Chop the bacon in pieces and sprinkle evenly over the syrup.  I keep the pieces bite sized.  

Sprinkle half of the brown sugar over the bacon and then drizzle with the rest of the maple syrup. If you like a little spicy with your sweet and salty, sprinkle the top with just a pinch of cayenne pepper to your taste!  This is totally option.  It's great either way.  

 Place in the 325 degree oven and bake for 25 minutes.  


All to cool for about 10 minutes and then cut in pieces.   I just cut along the lines of the individual rolls and the cut those pieces in about thirds.

Hot Crab Dip!


This "Hot Crab Dip" is cheesy and delicious!  Spread it on crackers, dip tortilla chips in it or spread it on sliced baquettes!  This is a great party appetizer or game day treat!  It's also really easy.  Make it up the night before and just bake the next day right before your gathering. 

 Here is what you will need:

8 oz. pkg. cream cheese, softened
1/2 cup mayonnaise
1/4 cup sour cream
3-4 green onions, sliced thin and including the green tops
1 cup shredded mozzarella, divided
1/2 parmesan cheese, divided
1 tsp. hot sauce (I used Tabasco)
pinch of cayenne pepper to taste
1/4 tsp. garlic powder
1 tsp. Worcestershire sauce
8 oz. crab meat (whatever is available in your area)

Preheat oven to 350 degrees.

I a mixing bowl, blend the cream cheese, mayonnaise and sour cream until smooth. Stir in 3/4 of the green onion.   Stir in half of the mozzarella and 1/2 of the parmesan cheese.  Add in the hot sauce, cayenne pepper, garlic powder and Worcestershire sauce.  Add the crab meat last.  If you use canned crab meat, drain it really well.  If you are using fresh lump crab meat, break it up just a bit.   Pour this into a 2 quart baking dish that has been sprayed with nonstick spray.  Top with the other half of the parmesan cheese and the other half of the mozzarella cheese.


  Place in a preheated 350 degree oven for about 30 minutes or until the top is just browning and bubbly.  Wait about 5 -10 minutes before serving.  This allows it to set up a little.  Sprinkle the top with the rest of the green onions.  I like it served on buttery crackers.  I will warn, this is a bit addictive!


Hot and Cheesy Artichoke Dip!


This "Hot and Cheesy Artichoke Dip" is so good that it's hard to quit eating it!  It's a little similar to it's cousin  Hot Spinach and Artichoke Dip!   The big difference is that, of course, there is no spinach in this and this one has a little spicy kick to it!   It's perfect game day food or serve it at your next party or get together! 
 
Here is what you will need:
 
1 (8 oz.) block of cream cheese, softened to room temperature
1 cup mayonnaise
1/2 cup sour cream
1/2 cup parmesan cheese, divided
1 cup mozzarella cheese
1 (4 oz.) can of green chiles, drained
2 Tbs. pickled jalapeno rings, diced
1/4 tsp. garlic powder
1/2 tsp. hot sauce (I used Tabasco sauce)
1 (14 oz.) can of artichoke hearts, drained and rough chopped 
 
Preheat oven to 350 degrees.
 
In a mixing bowl, beat the cream cheese until light and fluffy and smooth.  Beat in the mayonnaise and sour cream.   Stir in half of the Parmesan cheese and the mozzarella cheese.  Add the drained green chiles, jalapeno peppers, garlic powder and hot sauce.  Stir to blend.  Fold in the chopped artichoke hearts.  I chop them up, but I like to leave them in nice size chunks so they don't get lost in the mixture. 
 
Pour the dip in a 1 1/2 quart casserole or dish sprayed well with nonstick spray. Sprinkle the top with the rest of the parmesan cheese.  Place in the 350 degree oven  and bake for 30 minutes or until hot and bubbly and just starting to brown.  


Serve with tortilla chips, crackers, pita chips...whatever you like!
I will warn you, this stuff is addictive it's so yummy!


Funeral Sandwiches!


These yummy little bundles of goodness got their unusual name, because in the South, when someone dies you can guarantee that some sweet person will show up either at the funeral home or at the families house with  a warm pan of these little sandwiches.  Actually, the first time I had them, years ago was at the funeral home.   Of course, these are also great to serve for parties and other events.  They disappear fast! 

 Here is what you will need:

12 Kings Hawaiian Dinner rolls (could substitute another good dinner roll)
1/3 cup mayonnaise
12 slices thinly sliced deli ham (Black Forest or Honey Ham is best)
12 slices Swiss cheese
1/2 cup butter, melted
1 tsp. yellow mustard
1 tsp. Worcestershire sauce
1/4 tsp. garlic powder
2 tsp. poppy seeds

Cut the rolls in half with a serrated knife.  Spread each half with mayonnaise.  Place a slice of ham and a slice of Swiss cheese on each roll and cover with the other half.  Place in a 9"x13" baking dish. 

In a bowl, combine the butter, yellow mustard, Worcestershire sauce, garlic powder, and poppy seeds.  Pour over the tops of the sandwiches.  Cover the dish with foil.  Allow to sit and soak up the sauce on the counter for about 15 minutes. 

Preheat your oven to 350 degrees.  Place the baking dish on the center rack and bake for 15 minutes.


Uncover and bake for 5 more minutes or until lightly browned.  The cheese will be melted and ooey gooey and they are yummy!  Double the recipe if you are making for a larger party or crowd!

Curried Chicken Cheese Ball!


Did you know that today is National Cheese Ball Day?  Don't feel bad I didn't either.  Which is sort of ironic, because I planned on posting this cheese ball recipe today before I found out it was National Cheese Ball Day.  I just happened to get an email from Food Network and it said something about "In Honor of National Cheese Ball Day" ...very strange.

This is sort of a different cheese ball than most people make and if you like the flavor of curry you will love it.  I always make this cheese ball when my sister and nieces are coming to visit because they love it.  I must admit it is rather addicting.  It's one of those things you just can't quit eating, like potato chips or M&M's. 

Here are the ingredients you will need:

Canned chicken breast (canned works best for this because it mixes better), 2 blocks cream cheese, Parmesan Cheese, cheddar cheese, green onions sliced thin, Tabasco sauce, garlic powder, curry powder, soy sauce and walnuts or pecans to roll it in.


Leave the cream cheese out of the refrigerator until it is soft.  Slice the green onions as thin as possible and include some of the green blades for the color.   Mix the cream cheese, green onions, curry, shredded cheddar cheese, Parmesan cheese, garlic powder, soy sauce, and Tabasco sauce.  Mix in the chicken that has been chopped in small pieces.   Place it back in the refrigerator to chill before you try to roll it in a ball (about an hour will do).  Chop walnuts or pecans fairly fine and place them on wax paper or foil.  Shape cheese mixture into a ball and roll all sides it the nuts. 


This is really good served with seedless grapes, strawberries or sliced apples and Nabisco Chicken in a Biskit crackers.
It makes a huge cheese ball so I usually divide in half and make two out of it.


Ingredients:

1 cup chicken chopped
2 8 oz. cream cheese (you can use light cream cheese if you prefer)
1/2 cup Parmesan Cheese
2 cups shredded cheddar cheese
1/2 cup thinly sliced green onions
1 Tbs. curry powder ( I use mild curry powder so if you are using hot curry powder, use less)
1 Tbs. soy sauce
1 tsp. Tabasco sauce
1/2 tsp garlic powder
1 1/2 cup chopped pecans or walnuts

Pizza Crescents!


This is a simple little recipe really, but the results are so yummy!   It turns canned crescent rolls plus a few other ingredients into something so good!  

These are great served with pasta or soup or as an appetizer.  Two of them are also a good lunch!  The kids will love these for an after school snack and they can even assemble their own.  

 Here is what you will need:

1 can crescent rolls (I used Pillsbury)
1 cup pepperoni slices
1 cup shredded Mozzarella cheese
1/3 cup grated Parmesan cheese
garlic powder
1 cup pizza sauce or marinara sauce, warmed for dipping

Preheat oven to 375 degrees.

Separate the rolls into triangles. Place about three pepperoni slices at the end of the widest part of the triangle. Sprinkle with Mozzarella cheese and a little of the Parmesan cheese. Then roll them up.  You need to roll them pretty tight so the cheese doesn't leak out.  Place them with the pointed end down on a cookie sheet.  I lined my cookie sheet with nonstick foil, which is the best thing ever.  If you don't use that you might want to spray your cookie sheet lightly with nonstick spray. 


Sprinkle the tops with a little garlic powder and little more Parmesan!  Place in a 375 degree oven and bake for 13-15 minutes or until browned.


The cheese will be ooey gooey!  Place on a serving plate with the warmed pizza sauce or marinara sauce for dipping.


These are so good and you can add other ingredients you might like...browned sausage or beef, olives, jalapeno, or mushrooms!  Get creative!!! 


Strawberry Fruit Pizza!


Not long ago I worked in long term care for a couple of years.  Each month we would have a big birthday party celebration to honor all of the residents who had birthdays that month.  My mother and my Aunt Mary, were so kind to bake and donate all sorts of sweets...cakes, cookies, cupcakes and this fruit pizza, to serve at these parties. 

Needless to say, the residents looked forward to these days and didn't fuss over their lunches too much on that day, because they were saving room for their sweet treats.  Anyone who has ever worked with the elderly knows if they won't eat anything else, you can usually get them to eat something sweet. 

The staff looked forward to it about as much as they did also.  I have had several staff members say to me lately that they are dying for a piece of my mama's fruit pizza.  So I am posting this recipe for them! 

Here is what you'll need:

1 roll refrigerated sugar cookies
1 8oz cream cheese (softened)
2 cups confectioners sugar
1 cup refrigerated whipped topping
1 tsp vanilla flavoring
1 (15 oz.) can crushed pineapple, undrained
1 (3 oz.) pkg. instant vanilla pudding
3-4 bananas
approximately 4 cups large strawberries, sliced
1 pkg. strawberry glaze

Leave the roll of cookies out of the refrigerator to soften a bit.  Spray a pizza pan with baking spray, then pat the roll of cookie dough on the pan to the edges.  Bake as directed on the package minus just a few minutes of cooking time...just until the cookies are starting to brown.  Remove from oven and cool completely. 
With an electric mixer beat the cream cheese and confectioners sugar together, beat in the whipped topping, then add the vanilla and mix.  Spread this mixture over the cookie crust to the edges.

Next mix the pineapple (don't drain) with the instant pudding until well blended then spread over the cream cheese layer.  Slice the bananas and place in a single layer over the pineapple.  If you are making this ahead of time, you might want to squirt some lemon juice over the bananas to keep them from turning dark.  If you are serving  within a few hours, this isn't really necessary though.


Slice strawberries in half and arrange over the bananas with the large ones in the center and fanning out to the smaller ones on the outer edges.   Cut the end off of the strawberry glaze just enough to drizzles it over the whole thing starting in the middle and working your way out to the edges.  If you have a squeeze bottle, you can put the glaze in it and use it to squirt it on the pizza. Works beautifully!


Voila...strawberry fruit pizza! 

Slow Cooker Hot Chocolate!


This is a great idea for serving at a party or casual gathering.  It would be so much fun for the kid's sleepover or for a sledding party.    It's nice because you can make a large amount of hot chocolate and it stays good and warm in the slow cooker. 

 Also, if serving adults or teens, they can serve themselves.  You could set up a little beverage station with hot chocolate and various toppings and let everyone do their own thing with it!  This is a really rich hot chocolate.  You will never want the stuff in the envelope again!   I think this would be perfect on Christmas Eve!  

Here is what you will need:

2 cups semi-sweet chocolate chips (could use milk chocolate chips, but it makes it sweeter)
1 (14 oz.) can sweetened condensed milk (like Eagle Brand)
7 cups whole milk
2 tsp. vanilla
mini marshmallows
whipped cream

In a 4 -5 quart slow cooker, combine the chocolate chips, sweetened condensed milk, whole milk and vanilla.   Stir well.  Set the slow cooker on low, cover and cook on low for 2 hours.  Check and stir this 2 or 3 times, making sure the chocolate isn't sticking.   

At the end of 2 hours, use a wire whisk and whisk it all in the slow cooker.  If it doesn't look real great, don't worry, it will at the end.  The chocolate takes time to break down and all get incorporated.   Set the slow cooker to high, cover and cook for about another hour.  All slow cookers vary, so check it at 30 minutes, because in a really hot cooking slow cooker that might be enough.   At the end of the time, whisk really well again.  Now it should be smooth and nice.  

Turn the slow cooker to low and ladle into mugs.   Top with mini marshmallows or go all out and...


Go all out and add a big dollop of whipped cream!!!  This is the most decadent cup of hot chocolate ever!   You can also provide other toppings for your guests to experiment with...mini chocolate chips, crushed peppermint, toffee bits.  If it's an adult crowd, peppermint Schnapps!  Just let everyone have fun with it!  


FOLLOW ME HERE ON FACEBOOK FOR DAILY POSTS:

Follow Me on Pinterest